Lesson
1
-
The
Grip Procedure
When
you're starting to practice your
grip, I highly recommend you do
so with your feet together (see
the picture below) as this
is a stance you can repeat consistently
and this will allow you to form
a repeating grip day after day. Also,
when doing this make sure your
clubface is square to your target.
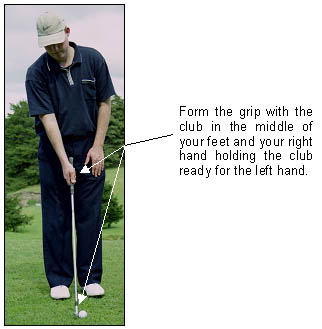
Once
youíre in a position similar to
the one above, the next step is
to place your left hand on the
grip. So bring your left hand
up to the grip and make sure the
back of your hand is pointing
at the target. Now position the
grip of the club as is pictured
below, running across the top
joint of your forefinger and under
the heel of your palm.
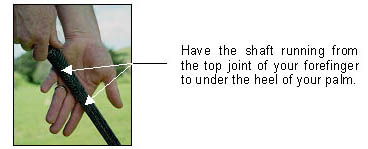
Once
your left-hand grip is in a position
similar to what Iíve demonstrated
in the previous couple of pictures,
you can now crook your forefinger
around the shaft. And from doing
this you'll find that you can
raise the club up off the ground
and maintain a firm grip just
by supporting the club with the
muscles of your forefinger and
the pad of your palm. Here are
some pictures to demonstrate what
I meanÖ

Once
youíve achieved this position,
lower the club back down and simply
close the last three fingers
of the left hand around the club.
And before you place your thumb
on the grip you need to know where
to position it.
Your
left-hand thumb should be put
in a position just to the right
side of the front of the grip.
Doing this will cause your thumb
to fit closely alongside the rest
of your hand. And to test this,
you should be able to place a
tee between your left thumb and
hand and hold the tee in place.
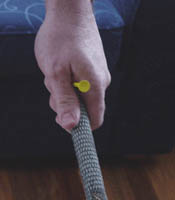
Now
when your left hand grip is complete
it should be compact and secure
and it should feel solid enough
that you could easily swing the
club with just your left hand.
Once
it is, then place the club on
the ground so the clubface is
square to your target and take
very careful notice of how
many knuckles you can see when
you look down on your left-hand
grip.
You
should only be able to see 2-3
knuckles.
And
I suggest you should have a 2
knuckle left hand grip if your
problem shot is a hook, and a
3 knuckle left hand grip if your
problem shot is a slice.
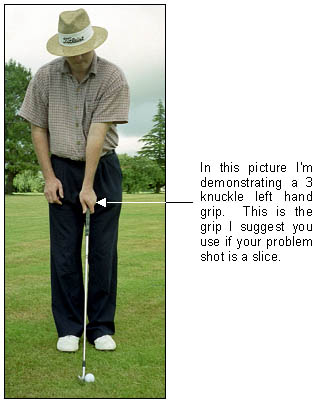
So
when your left hand is in a position
similar to the picture above and
you can see two to three knuckles
when you look down, then proceed
to placing your right hand on
the grip. But before you do this
I want to discuss something about
your actual physical grip (i.e.
the thing you hold onto on your
club!) that can make golf a lot
harder than it needs to be.
Grips
come in different sizes, shapes
and styles and the size of your
grips can have a big affect on
the types of shots you can hit.
For example, a thicker grip will
reduce your hand action and will
make a fade or slice more likely.
Whereas a thinner grip encourages
hand action and will help to produce
a draw/hook.
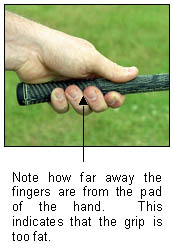
Now
a good way to tell if a grip is
either too thick or too thin for
you is by gripping a club with
just your left hand as Iíve just
shown you, and then noticing the
positioning of your middle fingers.
And here is a rough guide that
will indicate whether your grip
sizes are right for you or not.
- If
the tips of your middle fingers
barely touch the pad of your
palm then the grip is OK for
you.
- If
your middle fingers donít
touch the pad of your palm
then that indicates that your
grips are too big for you.
- If
your fingers push into the
pad of your palm then that
indicates that your grips
are possibly too small for
your hands.
Below
are some pictures, which will
clearly explain what you should
be looking for when testing your
grip sizesÖ
|
Grip
Too Thin
|
Grip
Too Fat
|
 |
 |
Go
through all of your clubs and
test this now. And if you find
that your grips are too small
or too fat get them changed immediately.
Also,
it's important that your grips
are not worn because having grips
that are hard and slippery will
cause you to grip harder. So make
sure your grips are in good condition.
If they're not, get new grips
fitted and make sure the size
is correct!
Now
letís move onto joining your right
hand to your left hand. There
are basically three different
ways in which you can grip with
the right hand, and I'm talking
about the underneath part of the
grip at the moment. The three
differences are called the Interlocking
grip, the Ten Finger grip
and the Vardon/Overlapping
grip. Each of these variances
is pictured below for you to have
a look at.
|
Interlocking
|
Ten
Finger
|
Overlapping
|
|
|
|
|
The
Interlocking grip is used
by Jack Nicklaus and John Daly
(just to name a two). But for
most golfers and especially
for golfers that slice the ball,
this should not be used, because
the Interlocking grip tends
to restrict the hands from releasing
in the swing, which can cause
slices.
The
Ten Finger grip is great
for young children and some ladies,
and itís especially good for golfers
who slice the ball to practice
with as it encourages a more free
and relaxed use of the hands,
which can only encourage a draw.
Finally,
the Vardon/Overlapping grip
is used by the majority of the
top golfers in the world today
and this is the one that I recommend
most golfers should use. And I
am only going to cover the Vardon
grip from now on as that is
the most popular and probably
the best grip to use for most
golfers.
So
to grip the club with the right
hand you must understand that
the grip should be completely
in the fingers. Here is a picture
that shows you where the club
should lie in the right hand.
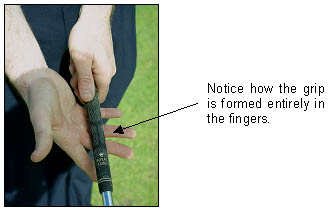
Here
are some more pictures that show
you how you should attach your
right hand to the already completed
left hand. It is very important
that you note that the grip of
the right hand is all in the fingers,
not in the palms.

After
getting to this position you simply
have to overlap your right hand
so the lifeline of your right
hand fits snugly over your left
thumb. There should be no gaps
between your right hand and left
thumb, as they should fit snugly
together.
Below
is a golfer demonstrating the
completed grip, and the important
thing to notice is that the V's
of both hands are pointing in
the same direction (along the
same parallel lines). This
is very important.
Donít
make the mistake that many do,
of thinking that the V of the
right hand should be pointing
to the same place as the V of
the left hand. If you do this
your right hand will be weaker
than your left hand and this will
cause the hands to fight each
other during the swing and lead
to inconsistencies.
Also
make sure that the thumb of your
right hand rides down the left-hand
side of the grip and not on top
of the club, as many people do.
Completed
Right Hander Grip
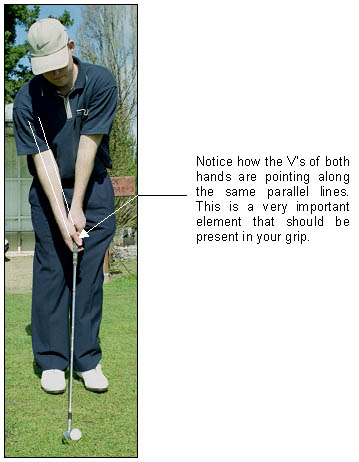
So
once your grip is formed like
above, go in front of a mirror
and complete your grip again and
compare it to the picture of this
golfers completed grip.
I
know there is a lot of information
here so following is a summary
you can print out to help you
practice your
new grip....
